Yesterday, was my mad dash day to get everything done for our upcoming “Tomato Garden Party” in conjunction with Foodbuzz.com’s 24 Meals, 24 Hours, 24 Blogs promotion. If you have no idea what I’m talking about, click here to take a look at my fellow food bloggers who are participating from all over the globe.
The theme of the party should be pretty obvious. Every dish of this 4 course meal involves the famous and fabulous Jersey tomato. We are even starting off the evening with a Tomato Martini.
So, even though I have a pretty good supply of homegrown tomatoes, I still needed more. I also am incorporating a tomato tasting course, so I wanted to get an assortment of Heirloom tomatoes. As you can see, I went to the right place. Look at those gorgeous babies.
Ron Gassaway, Delicious Orchards Vegetable Manager, was kind enough to give me a tour of the place and a little education on the different Heirlooms as well as the difference between many of their red tomatoes. Ron has been at Delicious Orchards for 25 years.
I chose two of each heirloom they had: Striped German, Cherokee Purple, Green Zebra, Evergreen and one medium size yellow that Ron did not know the name of. They had an impressive supply of ugly ripes which are always my tomato of choice if available at the grocery store. They are far more juicy and flavorful than the Field Grown tomatoes. They had some field growns available for tasting which I thought was a nice touch. They even provided the salt.
One of the great discoveries I made during my visit was the new canned Jersey Tomatoes. They’ve even been certified by the state as “Jersey Fresh.” Ron informed me it’s the first product of its kind and its selling like crazy. I bought 5 cans, used two for soup and 1 for making the Tomato Water for the Martinis. I can testify, the tomatoes are really flavorful and very simple, just tomatoes and salt.
Okay, after 3 bunches of basil, several bags of tomatoes, 5 cans of crushed tomatoes, 3 white eggplants, and 10 cheese peppers (for a later date), we were off to the bakery for a quick tour.
Ron gave me a little history of Delicious Orchards. The actual orchards were planted in 1911 on Route 537 in Colts Neck. In the 1950’s, Carol and Janet Barclay, the owners, opened a little roadside stand to sell their produce. Carol encouraged his wife to start selling some of her homemade pies at the stand, and they quickly became a hit. She enlisted the help of friends and neighbors to help her bake her pies in her kitchen. (Ah, the good old days before health inspectors.) In 1965 they bought the property where Delicious Orchards now stands.
All the baked goods are baked on premise. They use the apples from the orchard for their famous apple pies. They also do cakes, pastries, and bread. I could tell Ron had given this tour once or twice before. He admitted, he’s a very experienced tour guide and has seen his share of first grade field trips.
After the bakery, it was time for me to get moving and Ron to get back to answering the endless string of questions from customers in the Vegetable department. It was great meeting you, Ron, and thank you for the tour. I’ll be back. Oh, I also have to mention, on my way out I noticed a sign that said Delicious Orchards has a take out service. Just call two hours in advance with your order and they’ll have it ready for you and deliver it to your car. Sweet.
Delicious Orchards 36 State Route 34 S Colts Neck, NJ 07722 (732) 462-1989
Hey everyone, I’m blogging live from the Martha Stewart show. Cut me some slack, I’ve never live blogged before, but its so cool.
10:02am: Live From Martha Stewart’s Blogger Show
Being entertained by the “warm up guy” who is very funny. Some amazing bloggers in the audience. Two minutes from Martha. Matt, my hero, from Matt Bites is here.
I’ll be back. Need to stand and clap soon.
10: 05
Martha looks great. Her set is so cool, her whole little world right here. Kitchen, greenhouse, bedroom, all in one studio. Camera in my face, trying to smile and type.
Martha’s sister, Laura, who works with Elliot Laskin are here. They manage Martha’s Blog is here. Four of the magazine editors are here also.
Perez Hilton.com receives 9 million hits per day. OMG Blog ads is the ad group he uses. (note to self, just ignore. 😉 Geez, he blogs for 12 hours a day. He lives in LA and has a whole posse of spies in LA.
10:30
Matt Bites is on. He’s doing great.
I don’t think this is the easiest show Martha has ever done. She looks stressed. It’s a little hard to have an audience full of mad bloggers typing away. They keep trying to get us to clap. I have to remind myself to look up from my computer and watch the show. Next up, Political bloggers. Ben Smith and Jonathan blog for Politico.com. Oops, Martha just called Sarah Palin, Sharon Palin. I think I saw Martha blush. She handled it all gracefully, no worries.
Man, I wish we got a bathroom break.
My battery is about to die, so I’m signing off for now. I’ll load pictures when I get home. Meeting with fellow bloggers for lunch after the show.
Update:
Had a great lunch with some fellow bloggers from NewJerseyMomsblog.com. I got to meet Vanessa from Chefdruck.blogspot.com and Liz from ThisFullHouse.com and ThisFullHousereviews. So great to meet them in person and they had so many tips and contacts to help JerseyBites. Thanks ladies. It was a long day in the city and I was dog tired when I got home. So glad I don’t have to do that haul everyday. I’ve finished a guest blog post on my experience for TheFoodChannel.com and when its live, I’ll be sure to post the link.
People forget that summer doesn’t actually end until September 21st. This gives us a little more time to savor the last bits of the warm weather and all the wonderful bounties of the farm markets. We still have over a week left, even though many think Labor Day is the official close to summer.
I decided to take a ride over to Springdale Farms in Cherry Hill, NJ. This a family owned market equipped with a bakery and plenty of farm activities. They have “pick your own” seasonal produce as well as hayrides, fall corn mazes and local wine tasting events.
In my opinion, one of the best fruits of the summer is watermelon. Nothing shouts summer more than a big juicy watermelon. You have to have a watermelon at every barbecue and picnic. I was fortunate enough to get one on my trip to the market. However, let me tell you the problem with watermelon in my house.
Do you remember the story of The Little Red Hen? She needed help planting and picking the wheat as well as baking the bread. But no one wanted to help until they saw the beautiful baked bread. Then, the duck, pig and cat all wanted to eat
some. In our house, this happens with watermelon. Here is a typical scenario:
Jersey girl (me): “I’m cutting watermelon. Would anyone like some? Or would anyone like to help?”
Jersey husband: “Don’t think I want any watermelon.”( He says this in between pitches while watching the Phillies game.)
Jersey kids: “No watermelon for us. Can we have an ice pop?”
Jersey girl: “Okay. If no one would like some, I will cut it all and put it in a Tupperware container.”
So I proceed to cut the watermelon and pack it in containers for future use, keeping a plate for myself. The rest of the family sees me eating these juicy bites and decides they would like some. Before you know it, half the watermelon is gone and “jersey girl” did all the work. Now why doesn’t anyone decide they want watermelon before it is cut? It seems to me that they are acting like the duck, pig and cat in the story. But the late breaking news is that hubby (Jersey Boy) cut the watermelon after he read my story.
To celebrate this feat, I made an end of summer sorbet. I had some strawberries in the refrigerator and thought they would be a perfect match. It was a delightful way to end a meal.
Everyone had some sorbet, of course!
Strawberry Watermelon Sorbet
Ingredients
2 cups strawberries, cored and sliced
3 cups cut watermelon
½ cup sugar
the juice from half a lemon
Instructions
In a food processor or blender, process the strawberries until smooth. Add the watermelon, sugar and lemon juice and blend well. Pour the mixture into an ice cream maker and follow manufacturers directions.
If you do not have an ice cream maker, the freezer method can be used. Pour sorbet into container, cover and place mixture in the freezer. When it is semi-solid, mash it up with a fork and refreeze again. When frozen, place in a food processor or blender and process until smooth. Cover and refreeze until serving time.
Love to cook, love to eat and love to run (thank God)! I am also the CEO of a household of four. My handsome hubby and beautiful two children keep me busy. If there is time to spare, I enter recipe contests and work on my blog to feed my obsession with food.
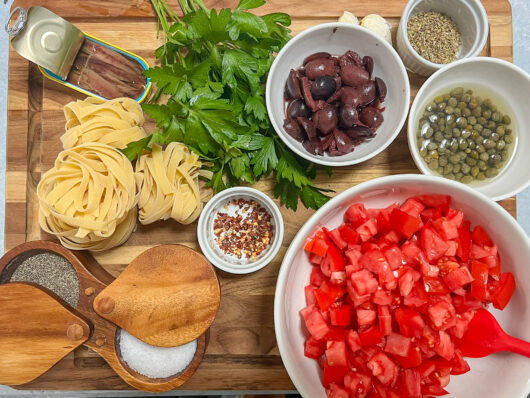
Pasta alla Puttanesca is a classic Italian dish bursting with fresh tomatoes, salty capers, and savory anchovies, all tossed in rich olive oil and Italian seasonings. This hearty meal is perfect for any night when you crave a quick and satisfying dinner and is easy to make!
While pasta is a rare treat in this house. I blame it on the fact that we do not have one ounce of Italian blood on either side of the family. My Grandfather wouldn’t even allow garlic in the house. Now, that’s just sacrilege even to a non-Italian like me!
But with so much fresh produce blooming during the summer months, I can’t help but make a delicious Italian dish that has a light, refreshing flavor even though it’s pasta. Pasta alla Puttanesca is a traditional Italian dish where cooked pasta is tossed in a bold sauce made from fresh tomatoes, garlic, anchovies, capers, and olives. This flavorful combination creates a savory and tangy meal that’s both hearty and satisfying and very easy to put together.
Using Fresh Jersey Tomatoes
I hadn’t made Puttanesca in years and never used fresh tomatoes before. If you’ve never had it, it is so worth a try. It packs a nice heat from the crushed red pepper and a depth of flavor you would never guess those oily little Anchovies could deliver. This recipe uses four cups of fresh diced Jersey tomatoes. The end result was “lick the bowl good.” No kidding, I was up in the middle of the night thinking about how good it was and how I wished there were leftovers!
Putanessca pasta is perfect for a quick weeknight dinner or even a Sunday feast or dinner party. It pairs well with a crisp green salad and garlic bread or with grilled chicken or fish for extra protein!
Why You’ll Love This Recipe
Simple ingredients: This recipe uses simple, pantry-friendly ingredients that are easy to find and affordable.
Quick prep time: It’s quick to prepare, making it perfect for busy weeknight dinners.
Fresh and savory: The combination of fresh tomatoes, capers, and anchovies creates a deliciously complex and savory flavor.
Customizable: It’s easily adjustable for different dietary preferences, such as using gluten-free pasta or tossing in other meats or veggies you have on hand.
Great for meal prep: Leftovers taste just as good, if not better, making it a great option for meal prep.
Key Ingredient Notes
Pasta – Serves as the hearty base that absorbs the flavorful sauce, making each bite satisfying and delicious. You can use any pasta you enjoy, including whole wheat or gluten-free.
Fresh Red Tomatoes – Adds a vibrant, juicy sweetness and freshness to the sauce, balancing the salty and savory elements, especially when it’s fresh Jersey tomatoes!
Extra Virgin Olive Oil – Provides a rich, fruity foundation that enhances the flavors of the garlic, anchovies, and seasonings.
Seasonings (oregano, red pepper flakes, salt, pepper) – Infuse the sauce with aromatic, spicy, and savory notes.
Capers – Bring a burst of tangy, briny flavor that cuts through the richness of the sauce.
Chopped Garlic – Adds a pungent, aromatic flavor that is classic in Italian dishes.
Anchovy Fillets – These small salty fish melt into the sauce, delivering a subtle umami richness that deepens the flavor.
Black Olives – Adds an additional layer of salty, briny flavor along with texture.
Chopped Parsley – Adds a fresh, garden taste and a natural pop of green color.
Parmigiano Reggiano – Offers a salty, nutty finish that complements the other flavors.
Pasta alla Puttanesca
Ingredients
1 lb. pasta (your favorite)
4 cups diced fresh red tomatoes
1/4 Cup Extra Virgin Olive Oil
1 tsp. dried Oregano
1/8 tsp. red pepper flakes
1/2 Cup sliced black olives
1/4 Cup capers
4 cloves chopped garlic
8 Flat Anchovy fillets in oil, chopped
1/2 Cup Parsley, chopped
1 tsp. salt
1/2 tsp. pepper
Shredded Parmegiano Regiano
Instructions
Cook the pasta: Bring a pot of water to a boil and add salt (2.5 tablespoons for each 6 quarts of water). Cook the pasta according to the instructions on the box until it is barely al dente.
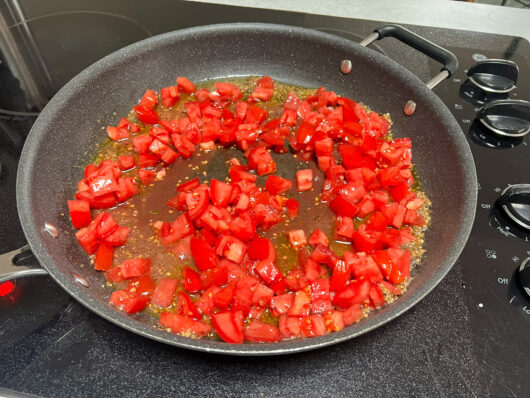
Saute the aromatics: While the pasta is cooking, get out a large skillet and add the olive oil and heat to medium high. Saute the garlic, anchovies, red pepper flakes and oregano until the anchovies melt down and the mixture becomes fragrant. This will take about two minutes.
Make the sauce: To the skillet, add the diced tomatoes, salt, and pepper and gently stir until the tomatoes become tender. Keep stirring until smooth or keep the texture chunky. It’s up to you! Add capers and olives, then continue to saute for another two minutes until combined.
Assemble the dish: Drain the cooked pasta and add it to the sauce in the skillet. Toss with tongs until the pasta is well coated and becomes al dente. Plate and garnish with parsley and grated parmesan cheese. Enjoy!
Notes
Recipe Tips
Dice the tomatoes into evenly sized pieces for consistent cooking and texture.
Cook the pasta until it's just barely al dente since it will cook further when mixed with the sauce.
Heat the olive oil over medium-high heat to avoid burning the garlic.
Allow the anchovies to fully melt into the oil to release their umami flavor.
Keep the tomatoes chunky for a heartier sauce, or stir until they break down for a smoother consistency.
Use tongs to toss the pasta with the sauce thoroughly to make sure each piece is well-coated.
Make sure the skillet you use to make the sauce is large enough to hold one pound of cooked pasta and some room for tossing.
Customize It
Use whole wheat or gluten-free pasta for a healthier or gluten-free option.
Add grilled chicken or shrimp for extra protein and a heartier meal.
Mix in sun-dried tomatoes along with the fresh ones for an intense, concentrated tomato taste.
Add a splash of white wine to the sauce for a touch of acidity and depth.
If you don't have fresh tomatoes, use crushed tomatoes for a smoother, more uniform sauce.
Add a handful of chopped kale, spinach, or arugula at the end for added greens and freshness.
Top the finished dish with toasted breadcrumbs for extra crunch.
Use fresh basil instead of parsley for an even more aromatic Italian flavor.
Storing & Freezing
Storing: Store leftovers in an airtight container in the refrigerator for up to 4 days. Let it cool completely before storing.
Freezing: Freeze cooled leftovers in a freezer-safe container or freezer-safe bags for up to 2 months. Thaw it in the refrigerator overnight before reheating. Keep in mind that the pasta may change texture when thawed, but it will still be delicious!
Reheating: Reheat on the stovetop over medium heat in a skillet or saucepan until warmed through, adding a splash of water or olive oil if needed.
FAQ
How can I make this vegetarian without anchovies?
Omit the anchovies and add extra capers or a dash of soy sauce to maintain the umami flavor. You can also use a plant-based anchovy substitute available in some stores.
What is the best type of pasta shape for Pasta alla Puttanesca?
Spaghetti is the traditional choice for Pasta alla Puttanesca, as its long strands hold the sauce well. However, you can use any pasta shape you prefer, such as penne linguine or even bowties!
Can I use canned tomatoes instead of fresh tomatoes?
Yes, you can use canned tomatoes instead of fresh. Use high-quality canned tomatoes, and adjust the cooking time as they may break down faster than fresh tomatoes.
I had an amazing meal last night at the newly opened Rosa Mexicano Restaurant in Hackensack at the Riverside Square Mall.Rosa Mexicano joins an amazing selection of restaurants there: Cheesecake Factory, Houston’s, McCormick and Schmick’s, Thai Chef, Morton’s Steakhouse, P.F. Chang’s China Bistro, and Maggiano’s Little Italy.It’s the eighth restaurant is this upscale Mexican chain, their first in New Jersey.If you haven’t been to one of their restaurants before, you will be amazed.It’s like no Mexican you’ve had before.The seasonings and flavors are so complex – nothing needs to hide under a cloying enchilada sauce here.
The décor was warm and hip, like all of their restaurants, including their signature blue tiled fountains on the walls, an open kitchen, and high airy ceilings.The menu was different than the New York City locations – it had less tacos and enchiladas options.We started off with the trademark Rosa Mexicano dish: the guacamole, prepared tableside.In addition to the usual tortilla chips, it also came with warm corn tortillas and two salsas: a complex smoky salsa pasilla and a hot salsa de tomatillo and habanero chiles.I couldn’t decide whether I liked the tortillas or the chips better, and our creamy and chunky guacamole disappeared quickly.
There was a large fun drinks menu to choose from (a rarity in our part of New Jersey) and we settled on the white sangria.We promised ourselves we would return soon for the frozen pomegranate margaritas.We then
had two delicious appetizers: a shrimp ceviche with pineapple and some albondigas in a smoky mole sauce.The servings were small but plenty thanks to the exotic flavors.We were already getting dangerously full after our guacamole.
For our main courses, Steve had the Enchiladas Suizas, filled with pulled roasted chicken and smothered in a creamy tomatillo sauce and queso fresco while I had an amazing roast pig called a mocate – it was crispy on the outside, but meltingly tender on the inside.It was served with some creamed spinach with mushrooms and creamed jalapeno peppers.We also had some rice and refried beans to share.The refried beans were incredible – I know it seems impossible for this pedestrian dish to impress – but they were velvety and had amazing seasonings with hints of coffee.Even though I was beyond full, I couldn’t stop myself from eating mouthful after mouthful.
By the time the dessert menus arrived, we were seriously considering unbuttoning our pants, but we couldn’t resist the churros with the three dipping sauces.As a tribute to their street food nature, they were shaken at our table in an azure blue paper bag to be thoroughly coated in cinnamon sugar.They melted in our mouths as we dipped them in dulce de leche, chocolate and raspberry sauces.The dulce de leche was the clear winner with its fine balance of salty and sweet.
I walked away thrilled with this new addition to our local restaurants.I had the best meal I’ve had in New Jersey since I moved here five years ago.I plan on returning to Rosa Mexicano very soon to try different drinks and have more of that incredible guacamole.
Vanessa Druckman aka Chefdruck, is not a chef, as her online name suggests, just a huge food aficionado. She loves to cook and to eat out, and then to write about her experiences. Vanessa is a transplant from the big city and now resides in Northern NJ. She is half-French and spent a big part of her childhood in France, so as a result, there’s no fear of cream and butter for Chefdruck. Read more from Vanessa at: http://www.chefdruck.blogspot.com/http://www.chefdruckwrites.blogspot.com/
Alright, get used to it. Everything I cook from now until November is going to have a tomato on it, in it, or under it. Sorry folks.
Actually, this is the remake of the fish I made for dinner last night. I visited my local Fish Co-op yesterday and they were filleting a fresh Flounder. So, Flounder it was. I tried to go the quick and easy route and used some bottled Wasabi sauce to dip the fish in before breading.
Unfortunately, the sauce just did not pull through the pan searing process. I couldn’t taste even one hint of Wasabi. The fish was still tasty, cooked to perfection I might add. (patting myself on back) The directions I found said 3 minutes each side. Cooking time was 3 minutes total, so don’t go by what you read. Always keep a close eye on fish. There is nothing worse than overcooked fish. Well, overcooked lamb is pretty bad. Oh hell, overcooked anything just plain sucks, so don’t do it.
So, what you see here is my lunch today. A few slices of tomato with shredded Parm on top. I wilted the baby spinach with a little olive oil in the microwave and voila. Delicious.
My shout out to you is, if you have a good recipe for Wasabi encrusted anything, send it my way. A restaurant we love called Europa South makes the most amazing Wasabi encrusted Sea Bass. I order it every time we’re there. I would really like to be able to recreate that flavor at home.
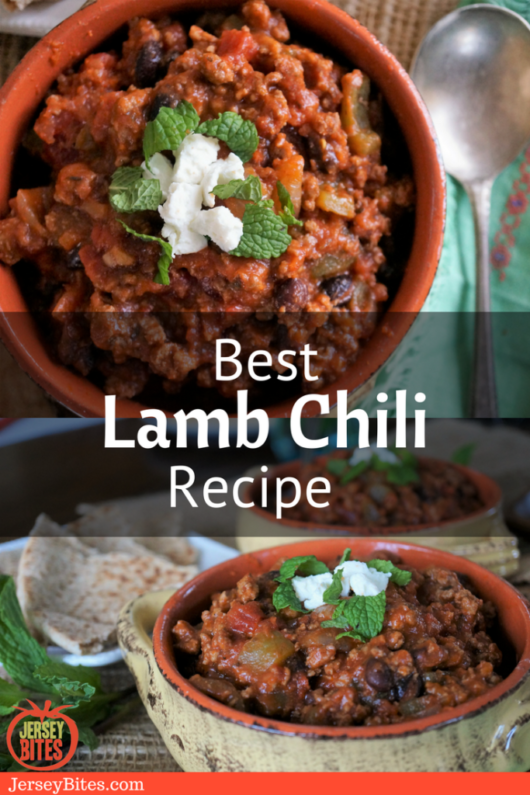
This hearty Lamb Chili recipe features ground lamb, a custom blend of warm spices, and is elevated with the refreshing flavor of mint and salty crumbled goat cheese to balance out the flavors. A perfect dish for the colder weather months or as part of an Easter feast!
While most chili recipes I come across use ground beef, I decided to give this easy chili recipe a unique twist by using ground lamb! This ground meat brings a rich, slightly gamey taste that really sets it apart from the milder beef versions. The lamb’s richness enhances the savory flavor and pairs well with the simple blend of seasonings used that DON’T include chili powder!
Chili Without Chili Powder
While chili powder is extremely common in most recipes, I found that adding it masked the distinct flavor of the lamb, which I felt needed to stand out! This recipe shows how flexible chili can be. You can change it to fit your personal tastes, adding your favorite blend of seasonings, meats, and veggies. I always make sure my recipes include ingredients you can easily find in your local grocery store or in your pantry so everyone can enjoy them!
Making my ground lamb chili is super simple and quick! Start by sautéing the veggies in oil along with the ground lamb to brown with some spices. Mix in the remaining ingredients, letting everything simmer to marry the flavors. Finish it off with fresh mint and goat cheese on top, and it’s ready to serve!
I’m not the only one who agrees that this is the BEST lamb chili recipe! Check out this kind email review from a reader:
“I make this chili several times each winter, and it has become a tradition in our family that I make it every time it snows since it snowed the first time I ever made it. When I first made it, my girlfriend at the time (now my wife) and I enjoyed it so much. Now, our two kids enjoy it with us… it has been quite the tradition. I’ve made some changes over the years (and I don’t ever measure when I cook).”
Chili with ground lamb is great for family meals, parties, or special holidays like Easter. Pair it with bread, rice, or a salad for a well-rounded meal that everyone will enjoy!
Why You’ll Love This Recipe
One pot dinner: The entire recipe is made in just one pot, making cleanup a breeze while saving you time in the kitchen.
Simple ingredients: This recipe uses simple and easy to find ingredients available in any local grocery store.
Unique flavor: Ground lamb adds a rich, unique flavor that sets this chili apart from traditional beef versions.
Customizable: It’s easy to customize, allowing you to adjust spices and ingredients to suit whatever you have on hand.
Meal prep: The chili freezes well, so you can make a big batch and have tasty leftovers for meal prep.
All the ingredients needed for this Lamb Chili recipe
Ingredients You’ll Need
Olive Oil – Acts as the base for sautéing the vegetables, helping to release their flavors.
Chili Vegetables (onion, bell peppers, garlic) – These provide a savory and aromatic foundation, adding texture and flavor.
Ground Lamb – The star of the dish, ground lamb adds a rich and slightly gamey flavor that makes the chili hearty and satisfying.
Seasonings (dried oregano, cumin, mint, salt, pepper) – These spices and herbs enhance the chili with earthy, warm, and slightly sweet flavors that pair well with ground lamb.
Canned Black Beans – Add texture and protein to the chili, making it more filling and nutritious.
Canned Tomatoes (diced tomatoes, tomato paste, tomato sauce) – Contribute acidity, moisture, and a slightly acidic tomato flavor, balancing the richness of the lamb.
Water – Used to adjust the consistency of the chili to make sure it’s not too thick.
Light Brown Sugar – Adds a hint of sweetness to counteract the acidity of the tomatoes that help balance the flavor.
Chipotle Pepper – Gives the chili a smoky heat, adding a spicy note.
Garnish (freshly chopped mint, crumbled goat cheese) – Fresh mint brings a bright, refreshing flavor, while the goat cheese adds a tangy creaminess, enhancing that rounds out the final taste of the chili.
Saute the vegetables: Add the olive oil to a large Dutch oven over medium-high heat. Once hot, add the onions and bell peppers. Saute for about 10 minutes or until softened. In the last 2 minutes, add the garlic and saute until fragrant without burning.
Brown the ground lamb: To the Dutch oven, add the ground lamb along with the dried seasonings. Saute, breaking up with a spatula until browned.
Add remaining ingredients: Pour in the drained beans, canned tomatoes, water, and light brown sugar, and add in the chipotle pepper. Stir to combine and simmer for 2-3 hours or until the raw tomato taste is cooked out and all ingredients are cooked through. Taste to adjust salt and pepper.
Garnish and serve: While hot, ladle into soup bowls and garnish with a sprinkling of freshly chopped mint and crumbled goat cheese. Enjoy!
Slow Cooker Lamb Chili
Lamb chili can also be slow-cooked in a crockpot! Brown the ground lamb with onions, bell peppers, and garlic in a skillet, then transfer it to the slow cooker. Add the remaining ingredients, except for the garnishes, and stir well to combine. Cover and cook on low for 6-8 hours or on high for 3-4 hours, then garnish with fresh mint and crumbled goat cheese before serving.
Helpful Recipe Tips
Heat the olive oil until it’s shimmering but not smoking for sautéing your vegetables. This will keep them from burning.
Cut the onions and bell peppers into even sizes to make sure the chili has a consistent texture.
Rinse the canned black beans thoroughly under cold water to remove excess sodium and to make sure the thickened canning juice does not get into the chili.
Add water gradually to control the chili’s thickness, allowing you to customize the consistency.
Cook the ground lamb until it’s no longer pink, making sure it’s fully browned for the best flavor.
How long it takes to fully cook lamb chili will depend on how big your pot is and what heat it is simmering at. Usually this takes 2-3 hours.
Taste the chili once cooked to adjust any salt, pepper, or other seasonings.
Flavor Variations and Substitutions
Moroccan: Add Moroccan spices (coriander, cinnamon) and apricots to the chili for a sweet and spicy flavor profile.
White Bean: Substitute black beans with white beans for a milder taste and creamier texture.
Greek: Incorporate Greek flavor elements by using feta cheese instead of goat cheese and adding a pinch of dried oregano and allspice.
Masala: Stir in some garam masala and replace the chipotle pepper with fresh ginger to give the chili a Masala-inspired flavor.
Vinegar: Add a splash of red wine or balsamic vinegar to deepen the flavors and introduce a slight tanginess to
Vegetables: Add hearty vegetables like chopped sweet potato or zucchini to change the texture and taste.
Spicy: For a spicy kick, increase the amount of chipotle pepper or add freshly chopped jalapeños to the chili.
Storage Instructions
Storing: Store leftovers in an airtight container in the refrigerator for up to 4 days.
Freezing: Cool the chili completely and transfer it to freezer-safe containers or bags, leaving some space at the top as it will expand when frozen. Freeze the chili for up to three months.
Reheating: Reheat the chili on the stove over medium heat, stirring occasionally until it is thoroughly warmed through. If it’s frozen, thaw it in the refrigerator overnight before reheating. Add a splash of water or broth if the chili seems too thick when reheating.
FAQ
How can I thicken the chili if it’s too watery?
If the chili is too watery, let it simmer uncovered for an extra 10-15 minutes to reduce the liquid, or you can stir in a small amount of cornstarch or flour mixed with water to thicken it without altering the flavor.
Can I use fresh tomatoes instead of canned ones?
Yes, fresh tomatoes can be used in place of canned. You will need to chop them and simmer the chili a bit longer to break down the tomatoes and concentrate the flavors.
What can I do if the chili is too acidic?
If the chili tastes too acidic, you can balance it by adding a pinch of sugar or a splash of cream. This will help neutralize the acidity and bring a smoother flavor.
This Lamb Chili recipe has been a family favorite for many years. If you adore Lamb as much as I do, you will love this chili. I intentionally leave out chili powder so that the true lamb flavor shines through. Don't skip the goat cheese and fresh mint garnishes, they really take it over the top.
Ingredients
2 Tbs. Olive Oil
1 Large Yellow Onion. coarsely chopped
2 Yellow, Orange or Red Peppers, chopped
4 cloves garlic, finely chopped
2 lbs ground lamb
1 Tbs. dried Oregano
1 Tbs. ground Cumin
1 Tbs. dried Mint (optional)
1 tsp. Salt
1 can of black beans, rinsed and drained
2 (15oz) cans diced tomatoes
2 (8oz) cans tomato sauce
1 (6oz) can tomato paste
1 cup of water
2 Tbs. Light Brown Sugar
1 Chipotle Pepper diced
More salt and pepper to taste
Garnish
Crumbled Goat Cheese
Chopped Fresh Mint
Instructions
Heat oil in a large dutch oven. Saute onions, red peppers until tender (approximately 10 minutes). Add garlic during the last few minutes.
Add ground lamb and brown with cumin, oregano and a teaspoon of salt. Add the rest of the ingredients and stir.
Simmer for several hours tasting periodically. Add salt and pepper as needed.
It’s that time of year when the garden is bursting at the seems and I am doing my best to eat every ripe little morsel. This year I planted green, yellow and red bell peppers as well as green Italian peppers. I have got more peppers than Peter Piper could ever pick let alone pickle. The tomatoes have been slow to ripen, but now I’m getting at least 4 a day. The plants are at 9 feet and counting. (see below) The Brandywine has yet to produce any ripe ones but they’re close and huge. I can’t wait.
So, last night with peppers, tomatoes and basil in bunches, I decided to throw together the recipe below. When I say “throw together” I mean it. All measurements are approximates and you can really substitute practically all the ingredients and come up with something equally delicious. That’s why I love stuffed peppers. The combinations are endless. I’ll give you some suggestions at the end and please if you have a favorite stuffed pepper recipe, leave a comment. I’m going to be eating a lot of peppers for the next two months. INGREDIENTS:
4 medium to large Green Peppers (other colors totally acceptable) 3 cups prepared couscous (use **plain or any flavored variety that suits your fancy.) 1 medium tomato diced 1/4 cup crumbled Feta 1/4 cup fresh Basil, chiffonade 1 6 oz. can tomato juice 1/4 cup of water
DIRECTIONS: Preheat oven to 350 degrees F (175 degrees C)
Cut tops of peppers off and hollow out. Mix tomato, feta and basil with couscous. Stuff each pepper with couscous mixture and place in an oven safe dish just large enough for the peppers. This will help you keep the peppers standing upright. Mix tomato juice and water and pour liquid around bottom of the dish and cover with foil.
Bake at 350 degrees for approximately 45 minutes to an hour.
We served peppers with roasted chicken breasts and a simple green salad. Some other combinations you can try: Brown Rice, zucchini, onion and feta White rice, black beans, corn, tomato, scallions and cheddar Couscous, roasted red pepper, basil and mozzarella And, there is always the ever popular Green peppers stuffed with ground beef and rice and topped with a seasoned tomato sauce. Which brings me right back to the 70’s.
Thanks for stopping by JB fans. I hope you give this recipe a try and I would love to hear about your garden adventures and recipe suggestions. Please leave a comment.
**I always cook plain couscous in broth, either chicken or vegetable. It adds some subtle flavor to the otherwise very plain pasta.
Saturday night was our second visit to the Silver Oak Bistro in Ridgewood. We ate outside both times, unable to resist the call of a comfortable summer night meal under the stars, even in the decidedly unromantic lighting of the Exxon station sign across the street. It’s never good to have a reminder of how much your ride home will cost!
I took a quick peek inside and found it to be charming, yet small. However, there’s nothing small about Executive Chef Gary Needham’s cuisine. Silver Oak dishes up inventive Southern fare beginning with homemade potato chips with a choice of two perfectly-paired dips: a smoky and sweet barbecue sauce with a hint of heat and a cool sour cream parsley lemon dip. These types of chips are so often too greasy, but these were perfect and addictive. Our basket was emptied in seconds. Unfortunately, we came to regret our haste in devouring the chips when we waited forty minutes for our appetizers to arrive.
Our waitress couldn’t have been lovelier and apologized repeatedly for the back-up in the kitchen. Once our apps arrived, any annoyance we were experiencing was soon replaced by delight as we tucked into an extraordinary pasta dish called Rags and Fungus, a homemade large ribbon pasta swimming in a rich white truffle cream broth with a generous selection of sauteed wild mushrooms. Our other appetizer was hushpuppies with a jalapeno center. They were served on a bed of collard greens which stole the show. The greens were studded with bacon chunks and butternut squash pieces, everything pickled in a caramelized vinegar sauce. I never thought it would be possible to like collard greens, but I now crave them and my mouth is watering as I write.
We didn’t have to wait as long for our main courses and I was soon digging into more inventive Southern fare. My pulled pork was tender yet the chunks were larger than you often see, allowing me to really appreciate its milky flavor combined with more of that delicious barbecue. The pork was served with more of those incredible collard greens and one of the Silver Oak signature dishes: the omelette-style macaroni and cheese. The cheesy noodles were wrapped in a thick casing of crusty melted cheese. I couldn’t have more than a few bites of this cholesterol-courting concoction, but they were memorable. My husband ordered the steak which was a disappointment. The steak itself was fine, but the barley risotto it rested on was unpleasantly crunchy and the creamed spinach was overly salty. He consoled himself by helping me eat my generous portion and we still had plenty to take home.
We were much too full for dessert, although we were sorely tempted to see what Chef Gary would do to jazz up lemon meringue pie. I will go back to Silver Oak, very soon, and I won’t stray from the Southern cooking he’s known for. There were tons of seafood options on the menu that are calling my name.
Silver Oak Bistro 26 Wilsey Square Ridgewood, NJ 07450 201-444-4744 Appetizers: $8 to $12, Main Courses: $19 to $25. Open Tuesday – Friday 5PM to 10PM, Saturday 4PM to 10PM, Sunday 4PM to 9PM. Dress: casual elegant.Credit Cards: Visa, Mastercard, Discover.
Vanessa Druckman aka Chefdruck, is not a chef, as her online name suggests, just a huge food aficionado. She loves to cook and to eat out, and then to write about her experiences. Vanessa is a transplant from the big city and now resides in Northern NJ. She is half-French and spent a big part of her childhood in France, so as a result, there’s no fear of cream and butter for Chefdruck. Read more from Vanessa at: http://www.chefdruck.blogspot.com/http://www.chefdruckwrites.blogspot.com/
If you’re a food enthusiast (and you must be if you’re stopping by here from time to time) you need to get yourself a nice glass of wine, tea, whatever your fancy and a copy of Laura Schenone’s The Lost Ravioli Recipes of Hoboken, A search for food and family.This family saga takes you on a trip back in time and across the Atlantic as the author sets out on her quest to find the true, authentic recipes of her Northern Italian great grandmother.This is a woman obsessed, and I can totally relate.She brings to life both turn of the century Italy and Hoboken as well as the sounds, smells and tastes of old world kitchens where pasta is hand rolled by Italian nonnas into paper thin “gossamer dough.”Trust me, you are going to salivate through the entire book.
I met the author at the Ocean County Library’s cookbook event last fall.She is a James Beard Award winner for her book A Thousand Years Over a Hot Stove; A History of American Women Told Through Food, Recipes and Remembrances.Laura lives in Montclair with her family and was gracious enough to allow me to reprint one of her recipes. This is a family recipe that has been “Americanized.” The true Italian recipe, a version of which is also included in the book, calls for Italian bietole and a yogurt like cheese called prescinseua.
There are many more recipes provided at the end of the book which of course thrills the obsessive cook side of me to no end.It’s such a treat to actually get the recipes for the dishes that Laura lovingly describes throughout this beautifully written book.(Oh, and she provides supplier names and contact information for the hard to find ingredients like Chestnut flour and cookware. Love her.) She also provides pictures to accompany all the step by step instructions for pasta making, rolling, filling, cutting, etc. (What I’d really love is to get Ms. Schenone to come do a pasta making class in my kitchen.I’m sure some of the Jersey Biters would be all over that. I don’t know, sounds like a press opportunity to me and a fun party. 😉
Spinach Torta via Hoboken
Yield: serves 10 to 12 as an appetizer or side dish 4 packages frozen chopped spinach 8 ounces cream cheese, at room temperature 8 eggs, beaten 1 cup grated Parmigiano-Reggiano salt and pepper, to taste parsley, to taste
1. Preheat oven to 350 degrees
2. Brush about 2 tablespoons of olive oil on the bottom and halfway up the sides of a 9 x 11 inch pan or Pyrex-type dish.
3. Begin with three mixing bowls; large, medium, and small. In the largest bowl, defrost the spinach very well. Expedite this with heat or the microwave if you wish. Place the cream cheese (or other fresh cheese) in the medium bowl. Beat the eggs in the small bowl.
4. Cream the cream cheese, using a handheld electric mixer. Add the beaten eggs to it, then the Parmigiano-Reggiano, salt and pepper, and parsley. Mix well, then pour half this mixture in to the spinach. Evenly spread the spinach mixture into the oiled pan. Cover the spinach with the remaining half of the lizuid egg mixture.
5. Bake about 45 to 50 minutes, or until the top is golden.
Sorry for the brief hiatus in postings. We took a little trip (long drive) to Maine this past week to visit my boyfriend’s family. Yes, this Jersey Girl was communing with wild turkeys, and, well, not a whole heck of a lot else. It rained for most of our stay. Sweet. Let’s just say, it’s good to be back. We did manage to have a nice, dry day in Portland. What a great little city. If you get up there definitely hit Bull Feeney’s on Fore Street. The most amazing sweet potato fries with horseradish mayo and curry mayo. Last time I was there I had the lamb chili which was fabulous. I so wanted to have their lamb burger this time around, but we were having lamb for dinner and I thought that twice in one day was a bit indulgent. Hey, I can show restraint now and then.
So, after putting on about 5 pounds in 4 days (did someone say restraint?) it’s time to trek my growing butt back to the lighter side. This is one of those recipes that just says summer to me. I make it over and over when Jersey corn is in season.
You can serve this as a side dish or as a salsa with chips, even over fish would be delish. Add crab or shrimp and it makes a great lunch. You can also omit the avocado if you plan to have left overs since the avocado will eventually turn brown even with the lime juice.
If you are making this a day ahead, wait to add the avocado until just before serving. This is one of those recipes where you really need to taste as you go and adjust the ingredients accordingly. Sometimes you may need more lime juice, more tomatoes, salt, you get the picture. You can also add some chili powder or cumin to up the spice factor.
Ingredients:
1 (15 oz) can black beans (You can use dried if you prefer. I’m too lazy.)
1-2 red ripe Jersey tomatoes (4 plum tomatoes)
2 cups fresh corn kernels or frozen (fresh if possible)
½ small red onion, chopped
1 avocado, cut in ½-inch cubes
1 bunch of cilantro, chopped
Juice of 1-2 limes, depending on your taste
¼ cup olive oil
Salt
Pepper
Cayenne
Directions:
In a serving bowl toss tomatoes with salt and set aside for 10-15 minutes to bring out juices.
Add beans, corn, avocado and onion and mix well.
Add cilantro, lime juice and oil. Stir to coat.
Season with salt, pepper, and cayenne to taste.
Serve immediately, or set aside for 30 minutes for flavors to intensify.

 our upcoming “Tomato Garden Party” in conjunction with Foodbuzz.com’s 24 Meals, 24 Hours, 24 Blogs promotion. If you have no idea what I’m talking about, click here to take a look at my fellow food bloggers who are participating from all over the globe.
 to get an assortment of Heirloom tomatoes. As you can see, I went to the right place. Look at those gorgeous babies.

 ttle roadside stand to sell their produce. Carol encouraged his wife to start selling some of her homemade pies at the stand, and they quickly became a hit. She enlisted the help of friends and neighbors to help her bake her pies in her kitchen. (Ah, the good old days before health inspectors.) In 1965 they bought the property where Delicious Orchards now stands.
 The Food Channel asked me to do a guest post on my experience at The Martha Stewart show yesterday. Here’s a link to the story. My Day with Martha


 Our waitress couldn’t have been lovelier and apologized repeatedly for the back-up in the kitchen. Once our apps arrived, any annoyance we were experiencing was soon replaced by delight as we tucked into an extraordinary pasta dish called Rags and Fungus, a homemade large ribbon pasta swimming in a rich white truffle cream broth with a generous selection of sauteed wild mushrooms. Our other appetizer was hushpuppies with a jalapeno center. They were served on a bed of collard greens which stole the show. The greens were studded with bacon chunks and butternut squash pieces, everything pickled in a caramelized vinegar sauce. I never thought it would be possible to like collard greens, but I now crave them and my mouth is watering as I write.


